Extensions for Magento 1 provide a relatively quick and easy way to enhance your online store with new features and abilities that would otherwise need to be coded by a developer.

Luckily, thanks to the hard work of thousands of devoted Magento developers which make up the Magento community, almost any feature you can think of is now available for sale on the Magento marketplace. The only thing left to do is pick the extensions you need and install them onto your site.
July 2026 Offer – For a Limited Time Only:
Get All Access Pass Package for Magento 1 for 25% off! Don’t miss out!
There are 3 ways to install extensions: The quick and easy way is via Magento Connect, via SSH or by uploading files directly to your FTP, which is our recommended best practice.
This article will give you a step by step guide to installing extensions using this method, as well as a general overview of the two other methods, for you information.
Preparing for Your Installation

Before you start with the installation, make sure you have everything you need:
- If you’re installing a free extension, you’ll need the product key provided by Magento Connect.
- If you’re using a paid extension like CM Multi Vendor Marketplace, download the files provided by the developer and a license key if applicable.
- Product keys and file uploads can work when installing an extension from Magento Connect, but success is not guaranteed.
- For the best outcome, its is recommended to upload files directly to the FTP root directory.
Direct Upload Via FTP
Step 1 – Upload the extension folder to your root directory
The first thing you need to do when installing a Magento extension is unzip the folder where the extension is stored and copy the App folder into either your store root directory using your FTP.
Step 2 – Take precautionary measures
Next, go to your Magento admin panel, and take the following 3 steps to make sure the process runs smoothly and safely:
- Check that you have a current backup of your site or create one by going into system → tools → backup. This will be useful in case anything goes wrong

- Disable compilations via system → tools → Compilations
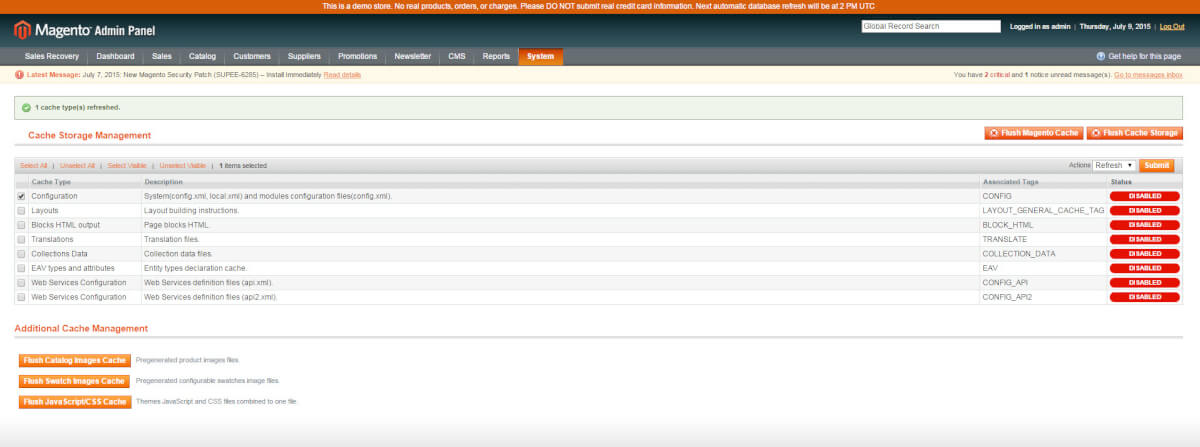
- Clear cache by going into System → Cache Management, selecting all the files in the list, choosing the refresh option in the dropdown menu, and finally clicking Submit.
- Now log out of your admin panel, and log back in again
Step 3 – Activate the extension
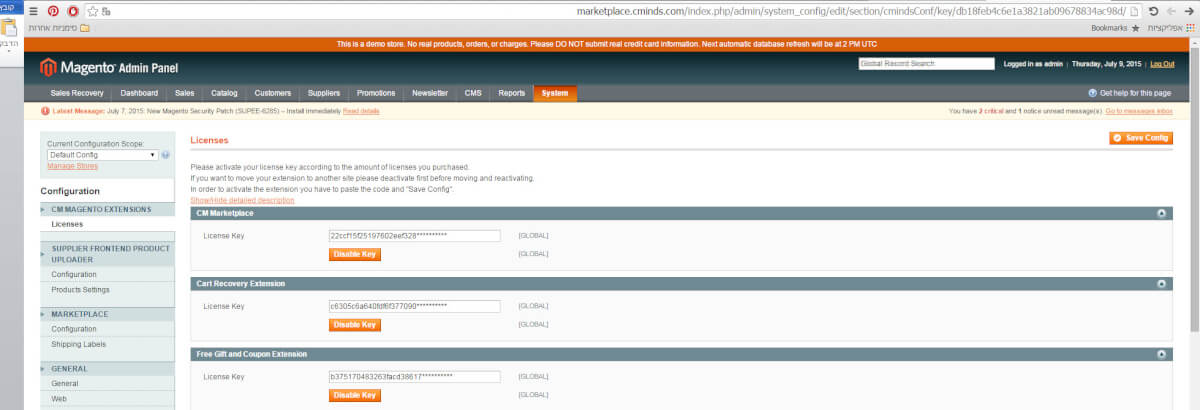
Go to System → Configuration
If the extension requires a license key, click on licenses on the left bar and enter your license key next to the extension name, which should appear in the list of recently installed extensions.
License keys are provided by the extension developers when purchasing them, and are different from product keys which are normally provided with free extensions on Magento Connect.
After entering your license key, click on Save config and wait to see an approval message saying the extension was installed and activated successfully.
Step 4 – Confirm Installation and activation
To make sure the installation went smoothly, go down to Advanced → Developer and under disable modules output, check that your newly installed extension appears in the list. If it does, it means that you did everything correctly and that you’re ready to go! Simply find the extension settings and start configuring them according to your preferences.
Installing Extensions Through Magento Connect
If for any reason you fail to install extensions manually, or if you’re attempting to install free extensions using a product key, you can install an extension through Magento Connect by going into the marketplace and obtaining your product key.

Next, continue by visiting System → Magento connect → Magento connect manager in your admin panel. Login with the same credentials you use to access your admin panel.
Magento will show all stages of the process on one screen, and ask you to either enter a license key or upload the extension files. There will be no need to clear cache or create backups- this will be done automatically by Magento connect.
Bear in mind that uploading extensions via Magento connect can sometimes cause malfunctions as it may upload unwanted files.

Uploading Extensions Via SSH
Installation via SSH is also a recommended alternative if you want to upload an extension on your local development box without using the downloader UI. In this case all you have to do is download the extension, unzip it, and insert it all in a single code straight into the SSH Terminal.
Installation Support

If you’re new to Magento or are experiencing issues downloading an extension, it’s nice to have good support from the extension developer. For some developers, like CreativeMinds, this means offering customers the option to pay a small fee to have the extension installed. This can save you time and the possible headache if you encounter any difficulties.
For the most part, installing an extension on your Magento site will run smoothly, but there is always the chance something will go wrong.
Good support means a developer that is available to help from day one, from the time you install an extension to when you renew it. It also means a developer that responds to your inquiries quickly, like CM does with our 24-hour max, 365 days a year response time.